
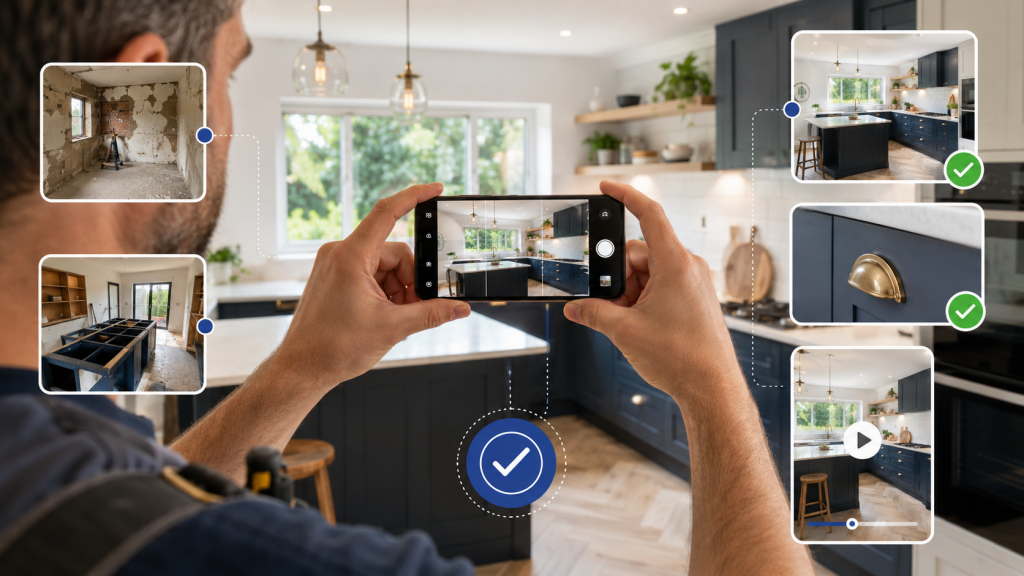
You do not need an expensive camera or professional photographer to create useful social media content for your business.
For most tradespeople and local service businesses, a modern smartphone is capable of taking clear, professional-looking photographs. The biggest difference normally comes from a few simple habits: cleaning the lens, choosing the right angle, removing clutter and remembering to photograph the work before, during and after completion.
The photograph does not need to be perfect when it is taken. It can be cropped, brightened and prepared for different platforms later.
What matters is recording the work while you are there.
Why Are Good Project Photographs Important?
Potential customers want to see evidence of the work your business completes.
Project photographs can help them understand:
- The services you provide
- The standard of your work
- The types of properties you work on
- The size of projects you can manage
- The areas you cover
- The equipment and materials you use
- What a finished result could look like
- Whether the company appears active
Photographs can become part of your website, social media, Google Business Profile, quotations, case studies and future marketing materials.
A completed project that is never photographed can only be seen by the customer who paid for it. A well-recorded project can continue demonstrating your work for years.
Clean the Camera Lens
This is one of the simplest and most effective improvements.
Smartphone camera lenses regularly collect:
- Dust
- Fingerprints
- Moisture
- Dirt
- Grease
- Material from pockets and tool bags
A dirty lens can make an otherwise good photograph appear misty, soft or poorly focused.
Before taking project photographs, wipe the lens gently with a clean, soft cloth. Check every lens if your phone has several cameras.
This takes only a few seconds and can noticeably improve the result.
Use the Main Camera
Where possible, use the main rear camera rather than the front-facing camera.
The main camera will normally provide better:
- Detail
- Focus
- Colour
- Low-light performance
- Image quality
Avoid relying heavily on digital zoom. Moving closer to the subject will usually create a clearer photograph than zooming in from a distance.
A wide-angle lens can be useful in small rooms, but be aware that it may distort walls, doors and objects near the edge of the photograph.
Use it when necessary, not automatically.
Make Sure the Work Is in Focus
Tap the main subject on the phone screen before taking the photograph.
This tells the camera where to focus and can also help it adjust the brightness.
Hold the phone steady and wait briefly before pressing the button. Taking several versions gives you a better chance of capturing a sharp image.
If the light is poor:
- Turn on available room lights
- Open curtains or blinds
- Move to a brighter position
- Hold the phone with both hands
- Rest it against a stable surface
- Avoid walking while taking the photograph
Check one or two images before leaving the site. A blurred photograph cannot always be repaired later.
Use Natural Light Where Possible
Good lighting can transform an ordinary smartphone photograph.
Natural daylight is often the easiest option. Open curtains, blinds and doors where appropriate.
Try to avoid photographing directly towards a very bright window. This can cause the work inside the room to appear dark.
Instead:
- Stand with the window behind or beside you
- Tap the work on the phone screen
- Adjust the exposure if the image looks too dark
- Photograph from another angle
- Turn on the room lights as well
For outdoor work, very bright midday sunlight can create strong shadows. Morning, late afternoon or slightly overcast conditions may produce a more balanced result.
However, do not miss the opportunity because the light is not perfect. A clear photograph of genuine work is still valuable.
Remove Unnecessary Clutter
Before taking the final photographs, look around the frame.
Potential distractions include:
- Rubbish
- Packaging
- Loose cables
- Tools
- Buckets
- Cleaning products
- Coats
- Drinks
- Material offcuts
- Personal belongings
- Open toolboxes
- Dust sheets
- Vehicle doors
- Other workers standing awkwardly
You do not need to make an active worksite look unrealistic, particularly when photographing progress. However, the final completed photographs should concentrate attention on the result.
Spend a minute clearing obvious clutter and closing cupboards, doors or toolboxes where appropriate.
Do not digitally remove defects or change the finished work in a misleading way. The objective is to present the real project clearly.
Keep the Phone Straight
Crooked walls, door frames and horizons can make good work look untidy.
Use visible features to guide the photograph:
- Door frames
- Window frames
- Worktops
- Roof lines
- Fences
- Brickwork
- Floor edges
Many phones allow you to enable a grid within the camera settings. The grid can help you keep vertical and horizontal lines straight.
Avoid tilting the phone sharply upwards or downwards unless the photograph requires it.
Take Several Angles
Do not take only one photograph.
A completed project should normally include:
- A wide photograph showing the whole area
- A medium photograph showing the main work
- Close-up photographs of important details
- Photographs from the opposite direction
- Images showing workmanship or materials
- A photograph including the surrounding property where suitable
Different angles provide more choice when preparing content.
One image may work best for Facebook, another for Instagram and another for the project page on the website.
Taking ten photographs at the time is much easier than returning to the property later because the only available image is unsuitable.
Take Both Portrait and Landscape Photographs
Different platforms and website sections use different shapes.
Portrait photographs
Portrait images are useful for:
- Instagram posts
- Facebook mobile feeds
- Stories
- Reels
- TikTok
- Vertical website sections
Landscape photographs
Landscape images are useful for:
- Website banners
- Blog posts
- Facebook link previews
- Google Business Profile
- Project galleries
If a completed project is particularly important, photograph the same view in both orientations.
Do not simply rotate the phone while standing in exactly the same position. Adjust the framing so the subject fills each shape properly.
Photograph the Work Before You Start
Before photographs are easy to forget, but they are often the most valuable images.
Once an old roof, kitchen, driveway or electrical installation has been removed, it may be impossible to recreate the original view.
Take the before photographs:
- Before unloading tools
- Before removing materials
- Before covering the area
- Before starting demolition
- Before the team enters the main frame
- From several relevant angles
Try to remember where you stood. Taking the final photograph from a similar position will create a much clearer before-and-after comparison.
Photograph Important Progress Stages
Work-in-progress images help customers understand the process behind the final result.
They can show:
- Site preparation
- Old materials being removed
- The underlying problem
- Repairs before they are covered
- Specialist equipment being used
- Materials arriving
- Safety measures
- Different installation stages
- The team working
- An unexpected issue being resolved
Progress photographs are particularly useful when much of the important work will eventually be hidden.
For example, customers may only see a finished wall, floor or roof. Progress images can demonstrate what was completed underneath.
Take Proper Photographs of the Finished Result
Do not rush the final photographs because everyone is ready to leave.
Before photographing:
- Finish the work
- Remove obvious rubbish
- Organise tools
- Sweep or clean the area
- Remove protective coverings
- Check that doors and cupboards are aligned
- Turn on relevant lighting
- Position vehicles appropriately
- Make sure team members are presented professionally
Take a mixture of wide and detailed images.
The final result should be the clearest and most attractive stage of the project.
Create Clear Before-and-After Comparisons
Before-and-after content is most effective when the viewer can immediately understand the transformation.
For a strong comparison:
- Stand in approximately the same position
- Use a similar height
- Keep the phone orientation consistent
- Include the same surrounding features
- Avoid using a heavily edited final image
- Make sure both photographs are clear
If the original photograph was taken in landscape, try to capture the final result in landscape as well.
A dramatic improvement can lose its impact when the two images show completely different areas.
Include the Team
Completed work is important, but customers may also want to see the people behind the company.
Useful team photographs include:
- Someone working naturally
- Two employees completing a task
- The team standing beside the finished project
- A team member explaining part of the work
- A new employee or apprentice
- Staff with a company vehicle
- Training or qualification days
- Equipment demonstrations
Make sure clothing and protective equipment are suitable for the task.
Natural working photographs often feel more authentic than asking everyone to pose formally.
However, include occasional clear team portraits so potential customers can recognise who may arrive at their property.
Photograph Company Vehicles and Equipment
Vehicles, tools and specialist equipment can all become useful content.
Photograph them when they are:
- Clean
- Properly positioned
- Clearly visible
- Being used appropriately
- Relevant to the service
- Free from distracting background clutter
Explain why the equipment matters.
A photograph of a machine becomes more interesting when the caption explains how it improves efficiency, safety or the range of services the business can provide.
Record Short Video Clips
You do not need to film a complete presentation.
Several short clips can be edited into a useful reel later.
Try recording:
- The original condition
- Someone preparing the area
- Tools or machinery being used
- A slow walkthrough
- A progress stage
- The completed work
- A before-and-after transition
- A team member answering one question
Hold each shot steady for several seconds.
Avoid waving the phone quickly around the room. Slow, controlled movement is easier to watch and edit.
For Reels and TikTok, record vertically. For websites and wider videos, record some landscape clips as well.
Avoid Recording Everything in One Long Video
A five-minute unplanned video can be difficult to turn into concise social media content.
Instead, record several individual clips of approximately five to fifteen seconds.
For example:
- The original room
- Materials arriving
- The team working
- A close-up of the installation
- The completed result
- A slow finished walkthrough
Short clips provide more flexibility and make it easier to remove any unusable footage.
Think About the Background
The main subject may look excellent while the background creates a poor impression.
Check for:
- Private paperwork
- Customer photographs
- Vehicle registration numbers
- House numbers
- Personal belongings
- Children
- Members of the public
- Competitor branding
- Untidy neighbouring areas
- Sensitive equipment or information
Move slightly or change the camera angle if something unsuitable appears in the frame.
This is often easier than trying to remove it later.
Get Permission Where Necessary
Consider customer privacy before publishing photographs or videos.
Do not assume every customer is comfortable with:
- Their face appearing
- Their children being visible
- Their exact address being identified
- Their vehicle registration being shown
- Private areas of the property being published
- Valuable possessions being visible
- Personal paperwork appearing
- A testimonial being used publicly
Explain how you intend to use the content and obtain appropriate permission.
When possible, avoid including identifying information even when the customer is happy for the finished work to be shared.
The project can normally be described using the general town or area rather than the full address.
Do Not Overedit the Work
Editing should improve the presentation without misleading potential customers.
Reasonable adjustments may include:
- Cropping
- Straightening
- Correcting brightness
- Improving contrast
- Correcting colour balance
- Reducing distractions around the edges
- Resizing for a platform
- Adding branding or a simple border
Avoid changing:
- The actual quality of the finish
- The materials used
- Damage or defects
- The size of an area
- Structural details
- The finished colour beyond realistic correction
The final image should still accurately represent the work the customer received.
Avoid Heavy Filters
Strong filters can make colours appear unrealistic.
This is particularly important when showing:
- Paint colours
- Flooring
- Brickwork
- Timber
- Roof tiles
- Kitchen finishes
- Bathroom tiles
- Vehicle paint
- Landscaping materials
Potential customers may use the images to understand the result.
Natural-looking adjustments are normally more professional than dramatic filters.
Do Not Use Screenshots When the Original Is Available
Screenshots are often lower quality and may include:
- Phone controls
- Notifications
- Cropping
- Black borders
- Reduced resolution
- Personal information
Send the original photograph or video wherever possible.
If the content is being provided through WhatsApp, choose the highest-quality sharing option available or send it as a document when preserving the original file quality is particularly important.
Keep an original copy stored safely before editing.
Give the Photos Some Context
Photographs are easier to turn into useful content when the person preparing the post knows what happened.
When sending project images, include:
- The service provided
- The general location
- What the customer needed
- The problem discovered
- What work was completed
- The materials or equipment used
- How long the project took
- Any interesting challenges
- Whether customer feedback is available
This does not need to be a professionally written description.
A short WhatsApp message or voice note can provide enough information for someone else to prepare the caption.
Create a Simple Team Photography Process
Everyone in the business should understand which photographs are needed.
A simple checklist could be:
Before starting
- Clean the camera lens
- Photograph the original condition
- Take portrait and landscape versions
During the work
- Capture important stages
- Photograph the team naturally
- Record several short video clips
- Show anything that will later be covered
After completion
- Clear obvious clutter
- Photograph the finished work
- Match the original before angle
- Take wide and detailed images
- Check that the photographs are sharp
- Send the project details
The easier the process is to remember, the more likely the team is to follow it.
Common Job-Photography Mistakes
Avoid:
- Taking only one photograph
- Forgetting the before image
- Using a dirty camera lens
- Photographing in very poor light
- Standing too far away
- Using excessive digital zoom
- Tilting the phone
- Leaving rubbish in the frame
- Photographing only small details
- Taking every image in one orientation
- Recording shaky video
- Using heavy filters
- Sending screenshots instead of originals
- Showing private customer information
- Leaving all the images unorganised
Most of these mistakes can be prevented without buying any additional equipment.
A Five-Minute Photography Routine
A useful routine at the end of a project could be:
Minute one
Clear visible tools, rubbish and packaging.
Minute two
Take three wide landscape photographs.
Minute three
Take three portrait photographs and several close-ups.
Minute four
Record two or three short vertical video clips.
Minute five
Check the images and send them with a short project summary.
Five minutes of organised photography can provide enough material for several social media posts, a Google Business Profile update and a future website project page.
One Project Can Create Weeks of Content
A properly photographed project could become:
- A work-in-progress post
- A completed-project post
- A before-and-after comparison
- A short reel
- A service explanation
- A location-focused update
- A team post
- A customer-review graphic
- A Google Business Profile update
- A website case study
This is why developing the habit of taking photographs is so valuable.
The business does not need to constantly invent new things to post. It needs to record the work already taking place.
Do You Need a Professional Photographer?
Professional photography can be extremely valuable for:
- Main website images
- Team portraits
- Vehicle photographs
- Large completed projects
- Advertising campaigns
- Company branding
- Important commercial work
However, it is not required for every weekly social media update.
Regular smartphone photographs can keep the business active between professional shoots and provide a more current view of everyday work.
The two approaches can work together.
Let Project Presence UK Turn Your Photos Into Content
Project Presence UK manages the complete online presence of local businesses from £300 per month.
You do not need to write captions or prepare perfect photographs.
Simply send your project photographs, occasional video clips and a few details into a WhatsApp group.
We then:
- Organise your content
- Select the strongest images
- Crop and edit photographs
- Prepare before-and-after comparisons
- Write the captions
- Adapt content for different platforms
- Schedule two to three posts per week
- Create up to two edited reels per month
- Update your Google Business Profile
- Store content for quieter periods
We can also help your team develop a simple photography process so useful content is collected consistently.
You complete the work. We make sure people see it.
Contact Project Presence UK to tell us about your business and find out how the service works.